Your vehicle is an extension of you and you shopped around to find the right one to fit your budget, taste, and lifestyle. When you pulled it off the dealership lot it was in pristine condition and you probably want to keep it that way. Unfortunately, the road and weather have a different plan.
Driving weather conditions take its toll on your car. Even in summertime when there is no snow and salt, you drive through exhaust as well as dust and debris that builds up on your car. Washing helps, but some pollutants build up over time, even on your tail lights. If you take a close look you may find that sparkle is gone and you are left with a foggy, dull appearance.
What can you do? Here are some great tips on how to clean tail lights so you can get that showroom look again:
1. Bring Together Your Cleaning Supplies

Having the right cleaning supplies the first step in how to clean tail lights. You probably have a cleaning kit for your car that includes a bucket, soap, and soft cloth. This works well for washing the whole car and your lights. If your current taillights aren’t in that bad of shape, this may be all you need. For oxidized and hazy-looking lights, you’re going to need additional supplies to tackle them.
Get some polishing compound, small tools, and painter’s tape as well as fine sandpaper that’s 1500 and 2000 grit. A micro-fibre cloth and buff pads work well too. You need to go to work on gently lifting off the cloudy scum that has built up over time and having some different supplies to work out the haze will make your job easier.
2. Wash Your Vehicle

First, give your vehicle a really good wash. You should start with a clean slate so you don’t contaminate the tail lights while the deep cleaning is taking place. Focus on the tail lights and give them an extra cleaning with warm, soapy water. Use a soft cloth to get around the edges and a fine point tool to gently get out dirt and debris.
3. Inspect for Scratches and Scuffs

When you are done you’ll be able to see any scratches and scrapes on the surface as well as that fogginess. Your tail lights are in the back so they don’t take as much of a beating as the headlight. They still can get hit by rocks and debris build up on the roads and bumps from other vehicles as well as accessing the trunk with various supplies during your day to day.
4. Start the Deep Clean

Now is the time to get out the extra tools. You may want to mask off around the tail lights to protect your paint. All it takes is a quick slip with a small tool or sandpaper and you’ve got another problem to deal with.
Start with your 1500 grit sandpaper. Wet it down and begin lightly sanding the damaged areas that you noticed. Keep the area wet and rinse often for a quick check. Move to the 2000 grit and continue sanding the entire light to get even coverage and after another rinse, have a good look. There should be a noticeable difference already. Use your polishing compound with a clean microfibre cloth to apply it over the entire tail light. Do a few applications to buff out any fine scuffs and marks.
Rinse and if necessary, get out your buffing pad with a handheld drill. This is going to further buff the plastic area smooth. Another good wash with soapy water and a good drying will leave you with a clean finish.
5. Polish & Wax the Tail Lights
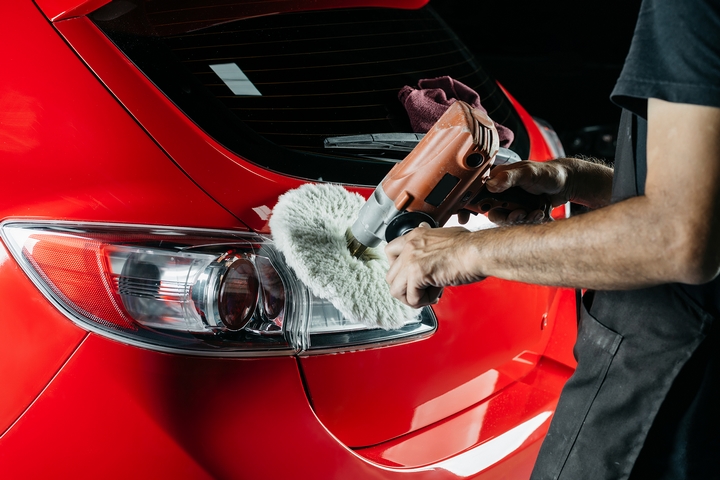
Now that you worked out the scuffs and dull finish, it’s time to make them shine like new. Any good vehicle plastic polish will do the job. Buff them after for that new car look. You can also use your favourite wax and work it into the light. It will protect the surface while giving you the shine you’re after. Buff it out with a microfibre cloth.
There are vehicle light restoration kits on the market that have everything you need to get the job done. If you aren’t satisfied with the outcome you can take it to a dealership or other pro detailing shop that works on light cleaning. They have all the tools and cleaners set up for professional vehicle light restorations.
This should give you the new car look that you want but if there is too much damage, you may want to replace the tail lights with new or used ones. There are great companies that have all the makes and models of new and used tail lights. Sometimes the best bet is replacing those scuffed up lights for factory new and high-quality used ones.
So there is your step-by-step guide on how to clean tails lights so they are brought back to their original luster. You can be proud that you put in the effort to make them shine again!